本記事は、AI連携でどこまで自動化できるかを検証したものです。記事の中身の妥当性については十分には検証できていませんが、作業過程で検証を何回か繰り返しています。元データの取得方法は過去記事を参考にしてください。では、以下がClaude codeを使って解析、生成した分析結果の記事です。
「最近、家賃が上がっている気がする」――そう感じている人は多いだろう。物価高騰が続く中、賃貸市場にも影響が出ているという報道は絶えない。では実際のところ、家賃は本当に上がっているのか。
筆者はある地域の賃貸物件データを約5ヶ月間・38時点にわたってスクレイピングし、統計的な手法で「本当の家賃トレンド」を分析した。単純な平均値の変化ではなく、物件の条件(広さ・築年数・設備など)を揃えた上で比較するという、ヘドニック価格指数的なアプローチを用いた。結果は、多くの人の直感を裏切るものだった。
データの概要
- 収集期間: 約5ヶ月(38時点)
- 生データ: 8,592レコード
- 分析対象物件数: 1,365件(重複・外れ値除去後)
- 物件タイプ: 賃貸アパート・マンション・一戸建て(ある地方都市周辺)
注目すべきは、大手賃貸サイトは同一物件の掲載コードを定期的に更新する仕様があることだ。そのまま集計すると同じ物件が複数カウントされてしまう。この問題を解決するため、Union-Find(素集合データ構造)というアルゴリズムを用いて同一物件を連結し、正確な集計を実現した。
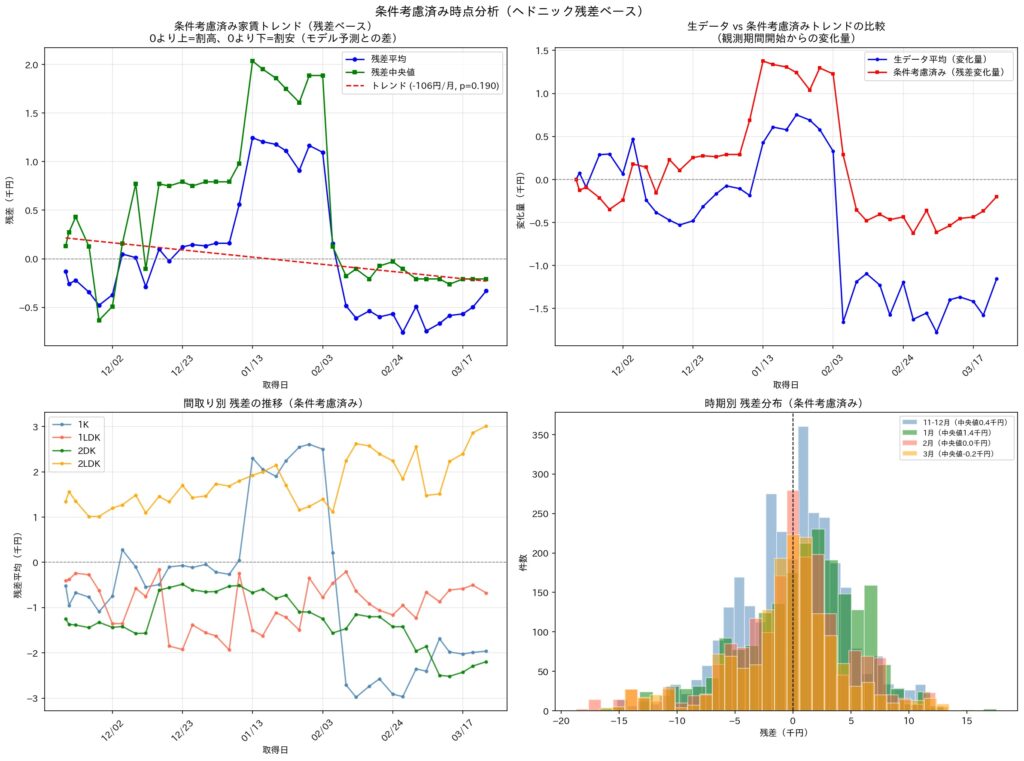
発見①「家賃は上がっていない」――条件を揃えると見えた真実
まず、シンプルに取得日ごとの平均家賃をプロットすると、月▲380円という下落トレンドが確認された(p<0.001)。「家賃が下がっているじゃないか」と思うかもしれない。
ところが、物件の条件(広さ・築年数・設備・階数など44変数)を重回帰モデルで除去した後の「残差」で同じ分析をすると――
トレンド: 月▲106円、p値=0.190(統計的に有意でない)
つまり、条件を揃えると家賃変動はゼロに近い。物価高騰の影響は、少なくともこの地域・この期間においては賃貸市場には波及していなかったということだ。
生データで見えていた「下落トレンド」の正体は、安価な物件の大量新規掲載によるミックス効果だった。
発見②「2月の急落」は本物か
データを眺めていると、2月上旬に平均家賃が突如▲1,500円近く急落する場面があった。
| 要因 | 金額 |
|---|---|
| 物件ミックスの変化(安価物件の大量掲載) | ▲1,000円 |
| 本物の需要緩和(条件考慮後も残る下落) | ▲500円 |
| 合計 | ▲1,500円 |
急落の3分の2はミックス効果で、残り3分の1が実態のある需要緩和だった。このような「見かけの変動」と「実態の変動」を区別するには、条件考慮済みの分析が不可欠だ。
発見③「1月は割高、2月以降は割安」という季節性
条件考慮済みの残差を月別に見ると、明確な季節パターンが浮かび上がった。
| 時期 | 残差(条件考慮済み) | 解釈 |
|---|---|---|
| 11〜12月 | ±500円程度 | 安定 |
| 1月 | +1,000〜+2,000円 | 需要ピーク・割高 |
| 2月以降 | ▲400〜▲800円 | 需給緩和・割安 |
1月は引越しシーズン前の駆け込み需要で、同じ条件の物件でも約1,000〜2,000円高く成約されていた。逆に2月以降はその反動で割安感が出ている。
賃貸を探すなら、1月ではなく2〜3月以降の方がコスト効率が良いという示唆が得られる。
発見④ 家賃を決める最強の変数は「追焚」だった
重回帰分析で44変数を投入したところ、最も家賃との相関が高かった変数は意外にも「追焚(お風呂の追い焚き機能)の有無」(相関係数r=0.670)だった。
| 順位 | 変数 | 相関係数 |
|---|---|---|
| 1 | 追焚設備あり | +0.670 |
| 2 | 専有面積(㎡) | +0.651 |
| 3 | 総戸数(棟の規模) | -0.584 |
| 4 | 仲介手数料額 | +0.526 |
| 5 | 礼金 | +0.459 |
追焚が最強の予測変数になった背景には、地域の入浴文化や生活習慣が影響している可能性がある。また、「大規模物件(総戸数が多い)ほど家賃が低い」という結果は、管理コストの規模の経済を反映していると考えられる。
発見⑤ 「2LDKは割高、1LDKは割安」という構造的価格差
間取り別に条件考慮済みの残差を分析すると、興味深い構造が浮かび上がった。
| 間取り | 残差 | 解釈 |
|---|---|---|
| 2LDK | +1,000〜+3,000円 | 一貫して割高 |
| 1LDK | ▲1,000〜▲2,000円 | 一貫して割安 |
| 1K | 季節性あり(1月に割高) | 需要変動大きい |
同じ面積でも、2LDKはファミリー向けの需要プレミアムが乗っており割高になる傾向がある。一方1LDKは供給過多気味で割安。カップルや二人暮らしなら1LDKも候補に入れると費用対効果が高い。
分析に使ったモデルの精度
最終的に採用したモデル(重線形回帰・44変数+交互作用2項目)の精度は以下の通り:
| 指標 | 値 |
|---|---|
| R²(決定係数) | 0.750 |
| 調整済みR² | 0.699 |
| RMSE | 4,506円 |
| VIF>10(多重共線性) | なし |
実際の家賃と予測値の誤差が平均±4,500円程度に収まっており、賃貸物件の価格モデルとして実用的な精度が得られた。
まとめ:賃貸市場の「見えない構造」
今回の分析から得られた主要知見をまとめる。
- 物価高騰は賃貸家賃に波及していない(少なくともこの地域・この期間)
- 家賃の下落トレンドは物件ミックスの変化が原因で、実態は横ばい
- 1月は割高、2月以降は割安というサイクルが存在する
- 追焚・専有面積・大規模物件の規模が家賃を最も強く説明する
- 2LDKは割高、1LDKは割安という構造的価格差がある
賃貸物件を探す際、これらの知見を活用することで、より合理的な意思決定ができるだろう。
分析の補足・免責事項
本分析は特定の賃貸情報サイトのデータをスクレイピングして実施したものであり、市場全体を代表するものではない。また、「掲載から消えた = 入居決定」という推定には不確実性が伴う。分析期間が約5ヶ月と限られているため、年間の季節変動を完全には捉えられていない点にも注意が必要だ。
本記事の分析コードはPython(pandas・scikit-learn・statsmodels・scipy)を使用して作成した。
どうだろうか、素人が使いこなすには難しいかもしれないが、分かっている人が分析する分には効率的な作業を行える。課題は本当にわかっているか、ちゃんと検証できているかだろう。 この資料を生成するまでの過程は、別の記事にしてみよう。